How to Create Amazon EKS using AWS Management Console and AWS CLI
In this article, we will explain the step-by-step process of creating an Amazon EKS using AWS management console and AWS CLI.
Prerequisites
- Basic knowledge of AWS Management Console and CLI
- Basic knowledge and the access rights required to run AWS CLI container
- Ensure that the IAM security principle you’re using has permissions to work with Amazon EKS
IAM roles and service-linked roles, AWS CloudFormation, and a VPC with related resources.
Step 1: Create your Amazon EKS cluster.
Let’s look at how to create an EKS cluster.
Create an Amazon VPC with public and private subnets that meet Amazon EKS requirements.

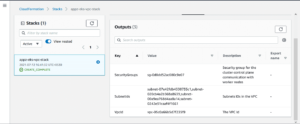
We can verify VPC and subnet creation using the AWS console as follows. Select CloudFormation > Stacks > appz-eks-vpc-stack (stack-name given )> Outputs
Create a cluster IAM role and attach the required Amazon EKS IAM managed policy to it. Kubernetes clusters managed by Amazon EKS make calls to other AWS services on your behalf to manage the resources that you use with the service.
a. Copy the following contents to a file named cluster-role-trust-policy.json:
Create the role using the command given below:
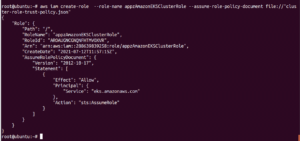
C. Attach the required Amazon EKS managed IAM policy to the role.
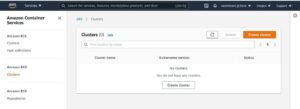
3. Open the Amazon EKS console at https://console.aws.amazon.com/eks/home#/clusters.
4. Select Create cluster. If you don’t see this option, in the Create EKS cluster box, enter a name for your cluster, such as appz-cluster, and select Next step. You will most likely be able to see the Create cluster option as shown below:
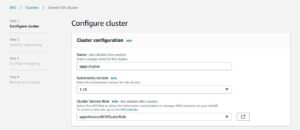
5. On the Configure cluster page, enter a name for your cluster, such as appz-cluster, and select a role like appzAmazonEKSClusterRole for Cluster Service Role. Leave the remaining settings at their default values and select Next.
6. On the Specify networking page, select vpc-00x0000x000x0x000 | appz-eks-vpc-stack-VPC from the VPC drop-down list. Leave the remaining settings at their default values and select Next.

7. On the Configure logging page, select Next.
8. On the Review and create the page, select Create.
To the right of the cluster’s name, the cluster status is marked as “Creating” for several minutes until the cluster provisioning process is completed. Continue to the next step only after the cluster status changes to “Active” as shown in the figures below.


Step 2: Configure your computer to communicate with your cluster.
In this step, we will create a kubeconfig file for our cluster. The settings in this file enable the kubectl CLI to communicate with your cluster.
Let’s take a look at how you can configure your computer to communicate with your cluster.
1. Create or update a kubeconfig file for your cluster. If necessary, replace with the Region that you created your cluster in.
By default, the config file is created in ~/.kube or the new cluster’s configuration is added to an existing config file in ~/.kube.

2. Test your configuration.
Step 3: Create an IAM OpenID Connect (OIDC) provider.
Now, create an IAM OpenID Connect (OIDC) provider for your cluster so that the Kubernetes service accounts used by workloads can access the AWS resources. You need to complete this step only once for a cluster.
- Select the appz-cluster which we have created.
- Select the Configuration tab.
- In the Details section, copy the value for OpenID Connect provider URL.

4. Open the IAM console at https://console.aws.amazon.com/iam/
5. In the navigation panel, choose Identity Providers.
6. Choose Add Provider.
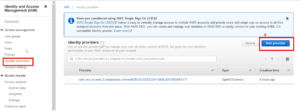
7. For Provider Type, choose OpenID Connect.
8. For Provider URL, paste the OIDC provider URL for your cluster from step three, and then choose Get thumbprint.

9. For Audience, enter sts.amazonaws.com and choose Add provider.

Step 4: Create nodes
Let’s now take a look at how you can create your Amazon EC2 Linux managed node group.
- Create an IAM role for the Amazon VPC CNI plugin and attach the required Amazon EKS IAM managed policy to it. The Amazon EKS Amazon VPC CNI plugin is installed on a cluster by default. This plugin allows Kubernetes pods to have the same IP address inside the pod as they do on the VPC network.
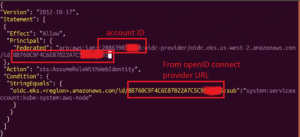
- Copy the following contents to a file named cni-role-trust-policy.json. Replace <111122223333> (including <>) with your account ID and replace with the value after the last / of your OpenID Connect provider URL and replace with the region you are working from.
- Create an IAM role for the Amazon VPC CNI plugin.
- Attach the required Amazon EKS managed IAM policy to the role.
2. Associate the Kubernetes service account used by the VPC CNI plugin to the IAM role. Replace <111122223333> (including <>) with your account ID.

3. Create a node IAM role and attach the required Amazon EKS IAM managed policy to it. The Amazon EKS node kubelet daemon makes calls to AWS APIs on your behalf. Nodes receive permissions for these API calls through an IAM instance profile and associated policies
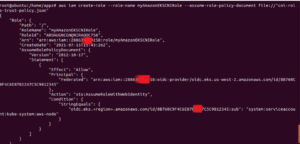
- Copy the following contents to a file named node-role-trust-policy.json.
- Create the node IAM role.
-
Attach the required Amazon EKS managed IAM policies to the role.
Here’s how you can add the Node group:
Requirement
Our requirement is to create a three node cluster in EKS. In order to achieve this, we are will create three node groups in three different availability zones.
We have already created subnets for clusters with the help of the cloud-formation template in step one of the EKS cluster creation.
Note that the subnet ID is allocated for the respective availability zones in which we plan to create node groups. You can view subnet details by going VPC > Subnets > in AWS console
In this tutorial, we will create three node groups in us-east-2a, us-east-2b, and us-east-2c availability zones.
Steps to Create a Node Group in an Availability Zone
1. Open the Amazon EKS console at https://console.aws.amazon.com/eks/home#/clusters
2. Choose the name of the cluster that you created, such as appz-cluster.
3. Select the Configuration
4. From the Configuration tab, select the Compute tab, and then choose Add Node Group.

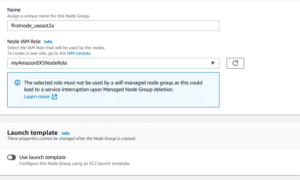
5. On the Configure node group page, fill out the parameters accordingly, accept the remaining default values, and then choose Next.
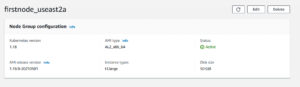
- Name – Enter a unique name for your managed node group, such as firstnode_useast2a.
- Node IAM role name – Choose myAmazonEKSNodeRole.
6. On the Set compute and scaling configuration page, change the Node Group compute configuration values to the ones given below:

Now, change Node Group scaling configuration as shown below:

Leave the remaining settings at their default values and select Next.
7. On the Specify networking page, select only the respective subnet which is created for the availability zone in which you want to create the node group.

Here, we selected subnet-06394d4180a018262 which is created in us-east-2a availability zone, so that our node group will be created in us-east-2a. Check VPC > Subnets > to get subnet and availability-zone details.

8. Select an existing key pair to use for SSH key pair and then choose Next. If you don’t have a key pair, you can create one with the following command:
In the above command, change to the region that you created your cluster in. Be sure to save the return output in a file on your local computer.

Leave the remaining settings at their default values and select Next.
9. On the Review and create the page, review your managed node group configuration and choose Create.
10. After several minutes, the Status in the Node Group configuration section will change from Creating to Active.
11. Repeat the whole steps 1 to 10 to create the rest of the node groups in desired availability zones.
About the Author