HOW TO CREATE LOGICAL VOLUME?
Introduction
Logical Volume Management (LVM) is a storage device management technology. It provides easy and flexible administration of storage devices and volumes, a higher level of abstraction, and control.
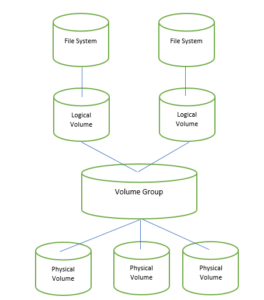
There are two types of volumes, namely, physical and logical. Physical volumes are physical devices or disk-like devices which are used as a raw building block for creating higher levels of volumes. They can be combined to form storage pools called volume groups. This allows us to create larger storage capacities by combining different physical volumes/devices. Logical volumes are used to manage physical volumes. It presents the user with a contiguous address space to create file systems at a higher level, as shown in the figure below. A volume group can be split to form multiple logical volumes like we create partitions on a physical disk. Users and applications interact with these higher-level logical volumes to build file systems.
The following steps explain how to create logical volumes using LVM.
How to Create a Physical Volume?
Let’s start with a brand new hard drive with no partitions or information on it. For this, first, find the disk name with which you will be working. Let us assume that the hard disk name is /dev/sdb.
1. Create a partition on the hard disk using fdisk.
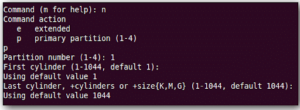
2. The aforementioned command will show a screen like the one below and prompt you to enter the parameters.
3. Enter the parameters in the order shown in the figure below:
Warning: The following steps will format your hard drive. Make sure you don’t have any important information on this hard drive before following these steps.
Use the following commands to create various types of partitions:
- n = create new partition
- p = creates primary partition
- 1 = makes partition the first on the disk
4. To prepare the LVM partition type, use the following command (t) and the given parameter (8e):
- t = change partition type
- 8e = changes to LVM partition type
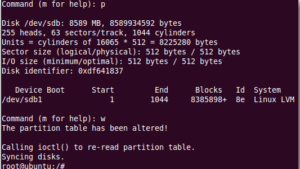
5. Verify and write the changes to the hard drive using the following commands.
- p = view the partition set up so you can review the changes before writing them to the disk
- w = write the changes to the disk
6. Create physical volume.
Enter pvcreate /dev/sdb1 to create an LVM physical volume on the partition we just created.
How to Create a Volume Group?
The following command can be used to create a volume group:
vgcreate
In our example, the command is as follows:

In this example, vgpool is the name of the new volume group we created. You can name it whatever you like.
How to Create a Logical Volume?
You can create a logical volume that LVM will use with the following command:
lvcreate -L <size> -n <lvm_name> <vg name>
The -L command designates the size of the logical volume, which is 3 GB in this case, and the -n command names the volume. Vgpool is referenced so that the lvcreate command knows which volume to get space from.
Format and Mount the Logical Volume
The final step is to format and mount the new logical volume with a file system. The following step formats the logical volume to the ext4 (fourth extended) file system.
The following step creates a mount point and then mounts the volume.
By following the above steps we have now completed the creation of a usable file system mounted from a logical volume.
How to Resize a Logical Volume?
1. Install and format the new hard drive.
Follow the aforementioned steps to create a new partition and change it’s partition type to LVM (8e). Then, use the pvcreate command to create a physical volume that LVM can recognize.
2. Add a new physical volume to volume group.
Add the newly created physical volume to the volume group.
Here, /dev/sdc1 is the name of the newly created physical volume.
3. Extend the logical volume.
Use the following commands to extend the logical volume:
lvextend -L +<size> <LV_NAME>
4. Extend the file system.
The logical volume is 11 GB but it won’t be reflected on the file system by default. To make the file system use the entire 11 GB available, you have to use the command resize2fs.
About The Author


