Overview
Graylog is an open-source platform for log management and analysis. With Graylog, you can collect, store, and analyze log data from various sources, giving you valuable insights into your systems.
Let’s start with the basics. Graylog allows us to set up something called “events.” An event, in Graylog, is a specific condition that we apply to our log data within a particular time frame or aggregation. These events can trigger alerts, which are incredibly handy for monitoring and taking action based on predefined conditions. We will discuss:
- The steps involved in configuring event notifications
- How to set up filters and aggregations
- How to set thresholds
- Steps involved in configuring email notifications
- Notification Settings
- Summary of the configured event definitions.
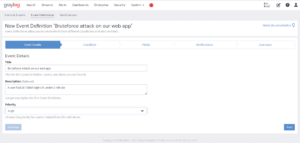
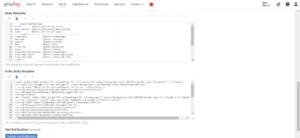
Step 1: Define the Event
To navigate to the Event Definitions section in Graylog. Here, you have the option to create a new event definition. We want an email notification when our server experiences multiple failed login attempts.
For our event definition, let’s give it a Title, like “Detection of Excessive Failed Login Attempts,” and a Description that explains its purpose. To ensure proper attention, we will set the Priority to “High.”
The condition is the central aspect of the event definition. We opt for “Filtering and Aggregation” as the condition type. We specify our desired criteria in the Search Query field: “Login failed for user.” We also set the Stream as the destination for our log files.
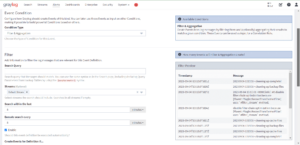
We begin by configuring the time frame, specifying a search within the past 5 minutes, and activating the search to run every 5 minutes. This enables real-time monitoring for any unsuccessful login attempts in the system.
Now, we move on to thresholds. We want to be alerted only when at least 5 failed login attempts are within that 5-minute window. So, we set the threshold condition as “count() is >= 5.”
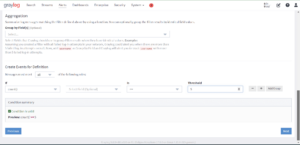
Remember the Event Fields (Optional). They automatically fetch data from the original log, eliminating the need for additional searches. It’s an excellent method for streamlining our process and enhancing efficiency.
Step 2: Define the Notification
Now, let’s look into how to set up email notifications for our events in Graylog. Email notifications help you to stay informed when something important happens in your log data.
There are two options for creating these notifications. You can click the “Notifications” button in the Alerts tab and define them within the Event section. Let’s go through it step by step for clarity and ease.
- Go to the Alerts Tab: First, navigate to the Alerts tab in Graylog. It’s like your command center for all things related to notifications and alerts.
- Create a New Notification: At the top right corner of the menu, you’ll see the golden ticket to your notification adventure – the “Create notification” button. Click it!
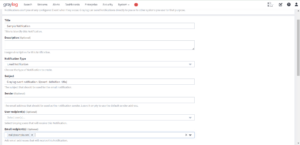
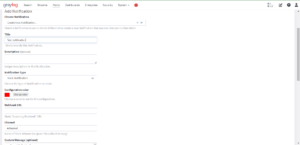
- Fill in the Details: Now, let’s give our notification a name. Set the Title as “Failed Login Attempt Alert.” This title will help you identify what this notification is all about.
- Add a Description: Next, provide a brief Description. This is where you will find what triggers this alert. For example, “Alert triggered when a failed login attempt is detected for a user.”
- Choose the Notification Type: Here’s where you specify the type of notification you want. For our purposes, we’re going with “Email Notification.”
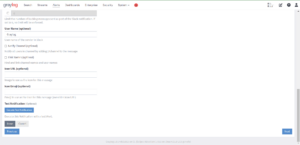
- Test the Notification: You can test the notification here by selecting “Execute Test Notification.” This ensures everything is set up correctly.
- Create the Notification: Once you’re confident everything’s in order, click the “Create” option. This action solidifies your notification setup.
Graylog offers various notification methods, including Email and Slack, allowing you to select the most suitable one for your requirements. Regarding email notifications in Graylog, a few crucial configurations must be set up to ensure the successful delivery of emails from your system.
Now, let’s explore the various configuration options available in the Graylog user interface for setting up email notifications. These options allow you to customize how your email notifications look and function.
- Subject: Think of the subject as the title of your email notification. It’s essential because it provides recipients with a quick idea of what the email is about. In Graylog, you can use JMTE templates to make your subject dynamic and informative.
- Reply-To: This is the email address recipients should use to reply to the notification. It’s a way to ensure that replies go to the right place, especially if multiple email addresses are involved.
- Sender: The sender’s email address is where the notification comes from. You can specify a specific address in this field. If left blank, Graylog will use a default address.
- User Recipient(s) (optional): Here, you can identify Graylog users who are eligible to receive the notification. This is handy if you want to send notifications to specific users within your organization.
- Email Recipient(s) (optional): In addition to Graylog users, you can provide additional email addresses where the notification should be sent. This is useful for including people outside your Graylog user list.
- Time Zone for Date/Time Values (optional): Select a particular time zone for the email content. This ensures that timestamps in the email match the relevant time zone, which can be crucial for global teams.
- Body Template: The body template is the content of your email notification. You can customize this to include relevant information about the event that triggered the notification. This is where you provide the details that recipients will see when they open the email.
- HTML Body Template: Similar to the body template, the HTML body template allows you to create a visually appealing HTML version of the email content. This can be useful if you want to include rich formatting or images in your notifications.
Before finalizing your notification configuration, performing a test alert is important. This will help ensure that your email notifications function correctly when triggered by a real event. Once content with your settings, click the designated button to create the notification.
Now, let’s explore how to set up Slack notifications in Graylog. Slack notifications are fantastic for informing your team about important events in your Graylog server. Here are the various configuration options available when creating a new Slack notification:
- Configuration Color: Highlight the custom message with your chosen color.
- Webhook URL: A webhook serves as a connection that seamlessly integrates Graylog with your Slack workspace. The URL is specifically designed for Graylog to send messages to the Slack channel of your choice seamlessly.
- Channel: You can decide where to send the notification in your Slack workspace. Choose a specific channel, mention a particular user with ‘@user,’ or notify an entire team with ‘@team.’
- Custom Message: This is the heart of your Slack notification. It’s the message that will be sent to your chosen Slack destination. You can use data from your Graylog event to create a dynamic and informative message.
- Time Zone for Date/Time Values: This option lets you set your preferred time zone for receiving timestamp notifications. The chosen time zone will be UTC by default, but you can customize it to match your team’s location.
- Message Backlog Limit (optional): To keep things organized and optimize your Slack notifications, you can limit the number of backlog messages sent. If you set it to 0, no restrictions will be applied.
- User Name (optional): Here, you can specify the user name that will appear as the sender in Slack. It’s an excellent way to ensure your team knows who the notification is coming from.
- Selections: You have a few options to choose from here:
-
- Include Event Information: If enabled, this option will include the complete title and description of the event definition in the notification. It helps recipients understand what triggered the notification.
- Notify Channel (@channel): Enabling this will notify all users in the channel with ‘@channel.’ It’s a way to ensure everyone in the channel sees the message.
- Notify Active Users (@here): When enabled, this feature will send a notification specifically to active users in the channel by mentioning ‘@here,’ thus preventing unnecessary notifications to inactive users.
- Link Names: When activated, this feature will locate and associate channel and user names within the notification.
- Icon URL (optional): You can specify an image to use as the icon for this message. It’s a visual element that can help your notifications stand out.
- Icon Emoji (optional): Alternatively, you can choose an emoji as the icon for this message. This setting can override any icon URL you’ve specified.
With these options, you can fully customize your Slack notifications from Graylog. Tailor your alerts to align with your team’s preferences, guaranteeing comprehensive updates on critical events from your Graylog server.
Notification Settings
Now, let’s delve into some essential notification settings in Graylog. These settings help us fine-tune when and how often notifications are sent out. Here’s how they work:
- Grace Period for Notification: To manage the timing of notifications, we can configure a grace period in Graylog. This grace period sets the duration Graylog will wait before sending subsequent notifications.
- Message Backlog: This setting allows you to specify the number of messages in each notification. Imagine it as a bundle of information. For instance, if you set this to 10, Graylog will collect and send the latest 10 messages related to the event in a single notification. It’s a way to ensure recipients get a context-rich notification without overwhelming them with a flood of individual messages.
By adjusting these settings, you can strike a balance between keeping your team well-informed about essential events and avoiding notification overload.
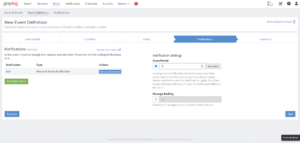
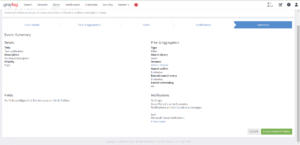
Summary
We can go on to the summary section to have a last look at our Event Definition.
Conclusion
In conclusion, Graylog empowers you to generate events based on specific conditions in your log data and configure notifications for timely alerts. This robust tool significantly improves your organization’s operational efficiency and incident-handling procedures. Now, armed with Graylog’s notification capabilities, you are well-prepared to leverage its advantages effectively!
ABOUT THE AUTHOR
")
